AWS: Simple and Secure Architecture
How to deploy a secure VPC on AWS with EC2, Bastion Host, NAT Gateway, and ELB from scratch.
Building a Simple and Secure Architecture on AWS
To follow this example you should have a basic knowledge of AWS, TCP/IP, and Linux.
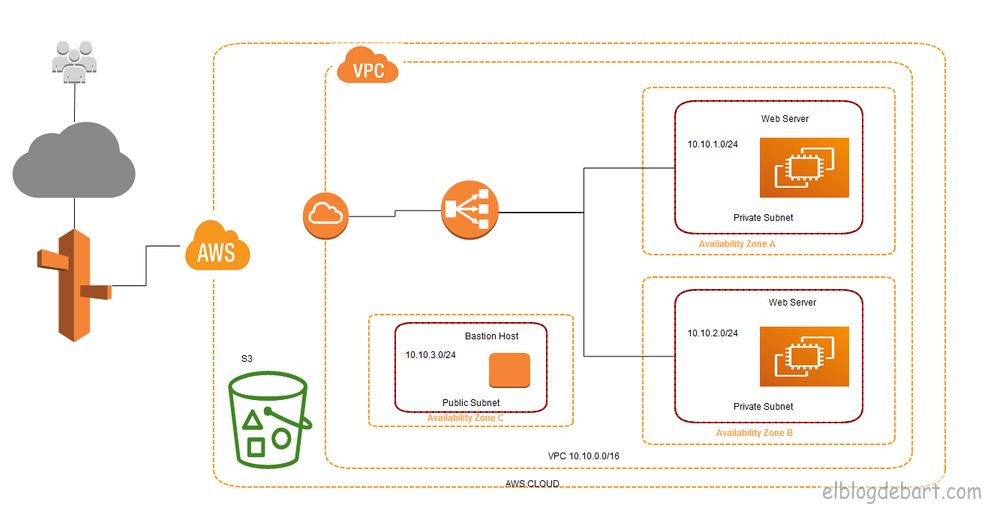
The architecture we’ll deploy includes the following components in the US-East (Virginia) region:
- 1 Virtual Private Cloud (VPC)
- 3 Availability Zones (A, B, C)
- 2 private subnets + 1 public subnet
- 3 EC2 instances
- 1 S3 bucket
- 1 Elastic Load Balancer (ELB)
- Route 53

Creating the VPC
A VPC (Virtual Private Cloud) is a virtual private network. This network is an isolated section within the AWS cloud where you can launch resources in a controlled manner.
To create one, go to the AWS console → VPC → Your VPCs → Create VPC.
Configure:
- Name tag: the name that identifies our VPC
- IPv4 CIDR block: the IP range, for example
10.0.0.0/16
Configuring Public and Private Subnets
Once the VPC is created, we need to define subnets within it. Subnets let us segment the network into smaller zones distributed across Availability Zones.
- Public subnet: has internet access. This is where the Bastion Host and NAT Gateway will live.
- Private subnets: have no direct internet access. Our web servers will live here, protected from the outside.
To create each subnet: VPC → Subnets → Create Subnet.
Configure:
- VPC: select the previously created VPC
- Availability Zone: distribute subnets across zones A, B, and C
- IPv4 CIDR block: assign non-overlapping ranges, for example:
- Public:
10.0.1.0/24 - Private A:
10.0.2.0/24 - Private B:
10.0.3.0/24
- Public:
Route Tables (Part 1)
Route Tables define where network traffic from each subnet is sent. By default, AWS creates a main route table that allows communication between subnets within the same VPC.
To create a specific route table for our private subnets: VPC → Route Tables → Create Route Table.
For now we only associate private subnets with this table. Traffic between subnets within the VPC works without additional configuration thanks to the local route that AWS adds automatically.
Internet Gateway and NAT Gateway
For our instances to communicate with the outside world, we need two key components:
| Component | Purpose |
|---|---|
| Internet Gateway | Allows bidirectional traffic between the public subnet and the internet |
| NAT Gateway | Allows private subnets to initiate connections to the internet (without exposing the instances) |
Configuring the Internet Gateway
An Internet Gateway is the internet entry and exit point for our VPC.
Steps: VPC → Internet Gateways → Create Internet Gateway → give it a name → Attach to VPC.
Once created, attach it to our VPC. There can only be one Internet Gateway per VPC.
Route Tables (Part 2)
With the Internet Gateway ready, update the public subnet’s route table to send internet traffic through it.
In the public subnet route table, add:
| Destination | Target |
|---|---|
0.0.0.0/0 | igw-xxxxxxxxx (our Internet Gateway) |
This means: “all traffic that isn’t local, send it to the Internet Gateway.”
For the private subnets, the default route will point to the NAT Gateway once we create it.
Configuring the NAT Gateway
The NAT Gateway allows instances in private subnets to download packages from the internet (system updates, dependencies, etc.) without being directly exposed.
Steps: VPC → NAT Gateways → Create NAT Gateway.
- Subnet: select the public subnet
- Elastic IP: assign or create a new one
Once created, update the route table for the private subnets:
| Destination | Target |
|---|---|
0.0.0.0/0 | nat-xxxxxxxxx (our NAT Gateway) |
EC2 Instances
EC2 instances are AWS virtual servers. They support Linux and Windows with different combinations of CPU, RAM, and storage depending on the chosen instance type.
For this example we’ll launch:
- 1 instance as a Bastion Host (in the public subnet)
- 2 instances as web servers (in private subnets, one per AZ)
Bastion Host
The Bastion Host is a fundamental concept for configuring a secure network. The idea is: our web servers are in private subnets and are not directly accessible from the internet. The Bastion Host acts as a controlled entry point.
Only the Bastion Host is exposed to the internet (on port 22/SSH), and from it we jump to internal servers. This drastically reduces the attack surface.
EC2 Instance (Bastion Host)
Launch the instance in EC2 → Launch Instance:
- AMI: Amazon Linux 2 (or Ubuntu)
- Instance type:
t2.micro(free tier) - Network: our VPC
- Subnet: public subnet
- Auto-assign Public IP: enabled
- Security Group: port
22open (ideally only from your IP) - Key pair: create or select an SSH key pair
EC2 Instance (Web Server)
Repeat the process for the web servers, with these differences:
- Subnet: private subnet (one instance per AZ)
- Auto-assign Public IP: disabled
- Security Group: port
80open from the ELB Security Group, and port22open only from the Bastion Host Security Group
Install a simple web server:
# On Amazon Linux 2
sudo yum update -y
sudo yum install -y httpd
sudo systemctl start httpd
sudo systemctl enable httpd

# Test page with server identifier
echo "<h1>Web Server - $(hostname)</h1>" | sudo tee /var/www/html/index.html
SSH to the Web Server via the Bastion Host
Without SSH Agent Forwarding we’d need to copy our private key to the Bastion Host to jump to internal servers — a security bad practice.
SSH Agent Forwarding
SSH Agent Forwarding lets us use our local private key as an intermediary, without storing it on the Bastion Host.
# Add the key to the local SSH agent
ssh-add ~/.ssh/my-key.pem

# Connect to the Bastion Host with agent forwarding enabled (-A)
ssh -A ec2-user@<BASTION-PUBLIC-IP>

# From the Bastion, jump to the private server (uses the local agent's key)
ssh ec2-user@<WEB-SERVER-PRIVATE-IP>Creating the AMI
Once the web server is configured, create an AMI (Amazon Machine Image) to easily launch identical instances — useful for ELB Auto Scaling.
EC2 → select the instance → Actions → Image and templates → Create image.
Elastic Load Balancer (ELB)
The Elastic Load Balancer distributes incoming traffic across multiple EC2 instances. This gives us:
- High availability: if one instance goes down, traffic is redirected to the others
- Scalability: we can add or remove instances without interruptions
- Health checks: the ELB probes instances and removes unresponsive ones from the pool
Creating and Configuring the ELB
EC2 → Load Balancers → Create Load Balancer → Application Load Balancer.
Configuration:
- Scheme: Internet-facing
- VPC: our VPC
- Availability Zones: select the AZs where our servers are
- Subnets: select the public subnets of each AZ (the ELB lives in the public zone and routes to the private ones)
Configuring the Security Group
The ELB Security Group must allow:
| Type | Protocol | Port | Source |
|---|---|---|---|
| HTTP | TCP | 80 | 0.0.0.0/0 |
| HTTPS | TCP | 443 | 0.0.0.0/0 |
And the web server Security Group must allow port 80 traffic only from the ELB Security Group.
Also configure the Target Group: the group of instances the ELB will send traffic to. Add our private web instances and configure the health check at / with HTTP protocol.
Final Result
With everything configured, the traffic flow is:
- The user accesses the ELB’s public IP or domain
- The ELB distributes the request across web servers (round-robin by default)
- The web servers, in private subnets, return the response through the ELB
- For admin access: SSH to the Bastion Host → jump to the private server
We can verify load balancing by reloading the page several times and observing the server identifier changing between responses.
Conclusions
With this exercise we’ve seen how to:
- Create and configure a VPC with public and private subnets
- Use an Internet Gateway to give internet access to the public subnet
- Use a NAT Gateway so private instances can access the internet without being exposed
- Implement the Bastion Host pattern to manage instances in private networks
- Use SSH Agent Forwarding to avoid storing private keys on intermediary servers
- Configure an ELB to distribute traffic and add high availability
This architecture, though simple, establishes the right security foundations for any AWS project. To go deeper, the official AWS documentation is the best resource available.
Comments
Stay in the loop
New posts about Linux, debugging, and systems programming. No noise, no spam — just signal.